Pages

Sunday, 22 November 2015

Papercut Patterns Sigma Dress

Making dresses in one of my favourite things at the moment. I'm not sure why, but I think I find them the most rewarding because once you've made a dress, you have a whole outfit ready to go! 

I absolutely adored this fabric when I first saw it on the Blackbird Fabrics website and knew that I wanted to use it on a dress so that I could show off as much of the pattern as possible. I had bought the Sigma dress by Papercut Patterns a while before and had been toying for quite a long time about which fabric to use to make it. 


Papercut Sigma dress 
The instructions for making this dress were nice and clear, although I was a little confused about the interfacing for the pockets. I like the fact that there are two skirt options, and two sleeve options. This makes it very versatile depending on what kind of dress you want. I went for the gathered front skirt (variation one) with short sleeves. I thought that the gathered version would work best with this print. 


These flowers!
I made a muslin of the dress top to check the fit in large. As a result, the top is now a medium at the arms graded to an extra large at the waist. This was to accommodate the fact that my waist is larger than my shoulders, proportionally speaking. This seemed to work pretty well, although when I make this dress again, I will maybe go from medium to large at the waist as this one does feel roomy. Perhaps I should have made that second muslin after all?! I think I may also take the shoulders in by half an inch and adjust the sleeves accordingly. 

One thing that is different with this pattern when compared to most other dress patterns like this (that I have seen) is that the sleeves are sewn in flat before you sew the side seams together, and you don't gather the sleeve heads. I was dubious about whether this would work, but it really did and now I am going to trust whatever Papercut Patterns say in future. 

I originally added six inches to the length of the skirt after reading some reviews which said that the skirt came out very short. I took off around two before I hemmed and I'm pretty happy with this length now. 

I love the pockets; they are a great shape (not too big) and I like the fact that they are attached to the waist seam so that they don't flop around. 

In summary, this dress is really comfortable, in fit and because the fabric is so lush!  


Sewing Recap

I haven't blogged for a really long time... but it's not because I haven't been busy making at all! So I thought that I would do a quick recap of some of the things that I made way back in the summer so that I have them documented, and also to remind me that I actually made them!


Checked Grainline Archer
First up is the Grainline Studio Archer shirt. This was always intended to be a wearable muslin. I love this fabric from Dressew, it was super cheap and I thought that it would not only be a good test but great for wearing around the apartment. And good for my pattern matching skills. I made a straight-up size 12 based on my bust size as a starting point.


Yolk cut on the bias
I really like the big pockets, the yoke dart and I enjoyed making the cuffs. However, I think that the shoulders are too broad for me, and the sleeves are pretty huge which is why I have them rolled up (and I must also confess that I haven't even finished the cuffs by putting buttons on because I knew straight away that I would never wear them all the way down!). I am planning on making another version of this with slimmer shoulders (maybe about an inch?) and I really want to make it using this fabric from Cotton+Steel - just to match my Alder shirt, y'know. Really showing my creature-of-habit-ness right there. I think I will also attempt a sleeveless version like Andrea or Fiona - both equally beautiful and simple.


Pleated Front Dress from Salme Patterns
Next up is the Salme Patterns Pleated Front Dress. I was immediatey drawn to the simplicity of this dress, but wasnt sure what fabric to use. Luckily my beautiful sister sent me this Sparkle Midnight blue fabric from ol' blighty by Atelier Brunette. I still haven't found a North American stockist for this stuff! I did an FBA and added on an inch each side. I think this really helped with the fit, although it feels snug round the chest and big at the underarms at the same time. I didn't think that would be possible! Another problem is that the fabric is quite sheer, but I tend to wear this kind of thing with leggings anyway. Which is a good thing, as with my handbag it rides all the way up to my bum! Not a good look... Enough complaining, I really like this dress and always get lots of compliments at work!


Victoria blazer from By Hand London
I have wanted to make the Victoria blazer from the amazing By Hand London for a really long time and took advantage of a 20% off sale. I got the paper pattern delivered all the way over here, as it wasn't available as a PDF at the time. I have to tell you, it was really nice not to have to cut out bits of paper and stick them together for once!


Blinded by the lining?
This fabric can be recognised from here. I inadvertently made myself a little suit (I haven't actually worn them together... yet). I decided to use a contrast fabric (leftover from here) for the lapels and collar, and it doesn't quite work because they a different thickness. As the dot has a bit of knit about it, it stretched quite a bit when I was sewing, and the black twill is quite stiff, so the lapels and collar don't sit as nicely as I would like. I tried tacking them down as well but this doesn't seem to help. I had some salmony coloured rayon in my stash, which I used for the lining. Unfortunately you can see the lining around the collar because of the way the lapels sit, which is a bit frustrating. I will definitely make a more wearable version of the Victoria, probably the shorter version as I think that will suit me more. I would like to make it in a nice linen, something not as thick as this hybrid knit stuff!


Colette Violet with placket
I was very excited when, way back in January, Violet was announced as the first Colette Patterns Pattern of the Month. I have a sleeveless version that I made a few years ago (which could be so much better now I have learnt about making the armholes smaller). I was even more excited when I saw the button-band hack! I always thought that the facing didn't really work with thin fabric and so was desperate to try. I really like the short sleeves, and decided to gather them and make a band out of biased binding to neaten them up again. I would definitely do this again.

Amanda of Bimble & Pimble fame egged me on to use this swiss dot after I commented on her white Archer. The fabric feels really nice, but boy does fluff stick to it. I have to get my lint roller out everytime I wear it! This is a size 10 and I think it's quite a good fit. For the next one I make I think I will try curving the hems (a la Archer/Alder) to add something different.

Monday, 27 July 2015

Alder Love

Grainline Studio Alder Top collar detail
I just can't get enough of the Grainline Studio Alder top. This is the third version I have made and I also have a v-neck version lined up. 

My first version was a test and I did View A. I did an FBA by following Jen's excellent instructions from the Grainline blog and I'm pleased to say it worked a charm. I cut a size 12 and added an inch which proved to be an excellent fit. However, I had a lot of issues with the collar and collar stand. This was my first time doing a proper collar and it took me a while, and a lot of unpicking, to get the hang of it. I also did not like the fit on the dress length version on me. It was too loose and a bit floaty. This is why I deemed version uno unworthy of any photos and I plan to reuse the fabric for purses, or maybe even a pillow! 

But now onto my two shirt length versions (both View A). The first version was made with some leftover linen that may seem familiar. And I used some cute blue dotty cotton bias binding from another dress for the armholes. I'm not completely happy with the length, as the fabric curls up after a few hours' wear, but it's still proving to be a bit of a summer wardrobe staple. 


A creased Alder
My second attempt at a shirt length version allowed me to continue my love affair with all things Cotton+Steel. This fabric is a cotton lawn and so lovely and light. It's called Sunrise Bone and I think that is sums up the colour very well. For this version I added an extra inch to the bottom to give it the extra length I wanted. This shirt is really great to throw on with a pair of jeans or other trousers. 

Grainline Studio Alder Shirt
I totally love this pattern, as well as all of the other Grainline Studio patterns (they are amazing - I want to make every single garment and all three bags!). There will be many more versions on this shirt I am sure! 

Monday, 18 May 2015

Bags for Friends

For my trip back home (leaving in four days - yay!) I decided I wanted to make some bags for my besties! These are gifts for my three favourite girlies to say Happy Birthday and I miss you all the time! Making these bags up has also allowed me to channel my love for Cotton+Steel, particularly their canvas range. 

Horsey Handbag
First up is this lovely horsey number. I bought these handles when I visited a Joanns in Lincoln City, Oregon at Christmas. I've been wanting to make this bag ever since then and I thought that this print from the mustang range for C+S was perfect. I love the tiny shiny bits and the pink and red together. 


I used the pattern that is shown in this pin as inspiration, but between me checking how much fabric I needed and going to check how to make it again, the link has completely stopped working. However the bag was a cinch to make, as the pattern is pretty straightforward and I would definitely make lots more of these. 

alt="seamwork madrid tote"
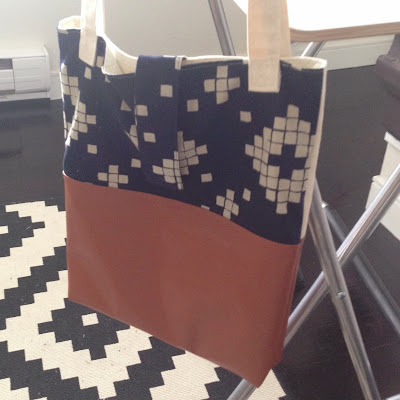
Seamwork Madrid Tote
My next bag to make was the Seamwork Madrid Tote from Colette Patterns. This pattern is from the first issue and I can't believe it's taken me so long to get round to making it. The stated completion time for this pattern is 2 hours and I think I managed to complete this in that time over two evenings. I think the longest part of making this bag was making the handles! The pattern recommends buying handles but I thought that these would be just as strong, and I left it a bit late to order some in time for my return to Blighty. 

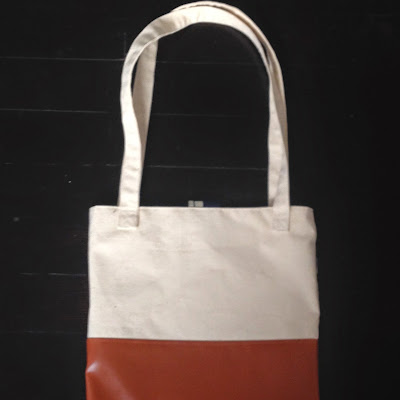
I used the indigo tile print from C+S for this one, as well as some really hefty unbleached canvas that I picked up from Dressew. I didn't quite have enough of the indigo print left so used the plain canvas on the back. 

alt="seamwork madrid tote"
Back of Madrid tote
The bottom is sewn up with some pleather that I ordered from Etsy. I really didn't like it when it arrived but it's definitely grown on me since I started sewing with it. I used a magnetic clasp leftover from my cooper bag for the fastening. I'm definitely going to make me one of these! 

alt="seamwork valencia clutch"
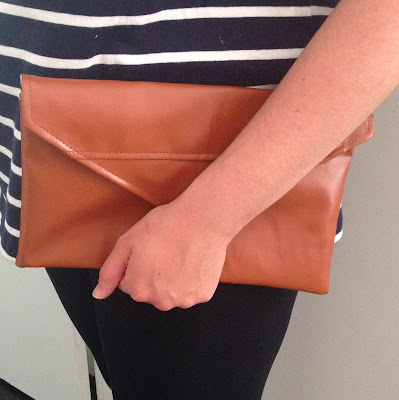
Seamwork Valencia Clutch
Last up is the Valencia clutch, also from Seamwork magazine. This one was even quicker to make than the Madrid.

alt="seamwork valencia clutch"
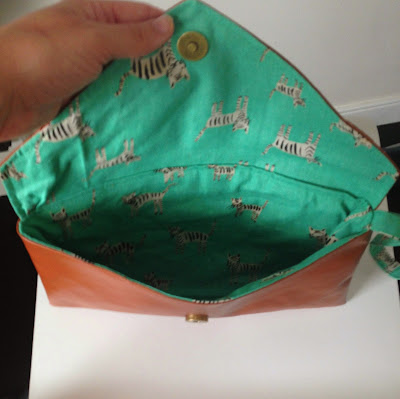
Valencia Clutch with kitty cat lining
I decided to go completely pleather on the outside and used this adorable print from the Hatbox range for the lining. I love the colour and the cats! Again this bag was so easy; my only frustration was with the fabric rather than the pattern. It just won't stay flat and always looks creased, and I can hardly iron it now. 

I have really enjoyed exploring some more bag making techniques with these three bags. Making bags and purses is a wonderful break from dressmaking. No fit issues here and you can use such wonderful fabric without worrying about looking like you're wearing a quilt! 

Sunday, 29 March 2015

Myrtles Mark 1 & 2

alt="Colette Patterns Myrtle"
Two Myrtles
I think that these two dresses, my woven Myrtles from Colette Patterns, are probably the most favourite things of all of the things that I have made. A bold statement, I know! But, I just totally love how easy they are to make, how quickly they come together AND that I haven't had to make any adjustments to the pattern to make them fit. 

I made the grey version in Robert Kaufman cotton chambray way back in August just after the pattern was first released. I was immediately taken with the idea of the dress in woven, rather than knit, and picked up this fabric from Spool of Thread with my birthday money. 

I did a test version first, which was meant to be a wearable muslin. However, I had a bit of trouble understanding how to install the waistband to start, so there was lots of unpicking involved. And then I realised with horror that I had sewn the skirt in back to front so the seam was running down the middle at the front! Bummer. But I had a muslin that fitted and I was ready to cut into my lovely soft grey dot. 

alt="Colette Patterns Myrtle"
Grey dot Myrtle
Like many other Myrtle makers on the web, in the end I sewed the channel for the elastic first and then threaded it through, rather than pinning it in and trying to sew round it whilst it was all bunched up. This just seemed a lot easier to me, much less stressful and therefore quicker in the long run. On this first version I also left off the pockets as I was going for instant gratification. 

My Myrtle featuring in a Viewbook!
This version made it into our Viewbook at work which is quite exciting (to me) as I'm wearing something I made and this will be seen all over the world! Look how much my hair has grown since this picture was taken at the beginning of October.

Recently I have been getting completely bogged down by fit adjustments and it has completely taken out a lot of the joy of sewing for me. Sad face. Part of the reason for this is that I just despise how long it takes me to make the changes, do the tests and then start again. But I know that it is better to spend more time fitting to have a more perfect garment then to just waste time and beautiful fabric on something that doesn't really fit. What's the point in that? So I am trying to take more time to make sure things fit and make more muslins. I am also spending more time mulling carefully about whether the garment will ever be able to fit me in the way that I want it to, before I spend ages making changes to a pattern. 

It was with the above in mind that I decided that I wanted to give my mind a rest and make another Myrtle with my gorgeous Hana rayon from the Cotton+Steel Frock collection last weekend. It is so soft and I love the colour. I was totally inspired by Jemjam's version from the Frock tour, and I also just wanted a quick win. 

alt="Colette Patterns Myrtle"
Rayon Myrtle
This time round, I did include the pockets as I'm still a bit sad that I don't have them on the original version. However, I'm not sure they work with the thinner fabric as they add a bit of bulk at the waist where I don't really need it. I also used 1 cm wide elastic, rather than 1 inch, so the waist is narrower than my first version and that prescribed by the pattern. It's much better for the thinner belts that I have to wear with the dress. 

I can't decide which dress I like most - they are both quite different because of the different weight of the fabrics. I like that this makes them seem like different dresses and I think I will make more in the future, maybe even a knit version... 

Saturday, 7 March 2015

A Bow Bag for Becky

Bow clutch bag
I made this lovely bow purse for my fabulous friend Becky as a belated Birthday present. Mailing stuff over to the UK is expensive so it’s nice to be able to make something that is extra special to send. 

For the main body of the bag and construction, I used Lisa Lam’s amazing Easy peasy purse instructions from U-Handbag. If anyone is new to clutch purse making, I highly recommend this kit - it is how I learnt everything I know about making purses with metal frames. The instructions are so clear. If you buy this kit with the fabric, all you need is the glue to put your first purse together!

For this purse, I cut out all of my fabric pieces and attached the facing to the shell of the purse. 

For the bow part, I cut two sets of rectangles using the same fabric (a lovely black chambray from Robert Kaufman), one at 5 inches by 10.5 inches and one at 3 inches by 1.5 inches. I then sewed them together to create two tubes, and turned them inside out. 
Rectangles cut and ready to sew
Sew the little one together to create a loop. Turn it inside out and then fix it to one of the shell pieces of the purse with a couple of hand stitches. 
Small loop sewn together at each end
Small loop fixed to the centre of one side of the purse
I then threaded the large tube through the tiny one by folding the fabric like a concertina and then poking it through. 
Concertina the fabric and poke it through the little loop (that is fixed to the purse)
Spread out to your liking and pin in the middle to hold in place.
I then spread it out and pinned it so that when sewing the shell of the purse together (right sides together) it didn't budge when sewing the sides together.


Finished outer shell with bow
I then followed the rest of the instructions according to the Easy Peasy kit and voila, a purse for Becky!  (The lining fabric is a double gauze from Sevenberry – it is sooo soft).

Sevenberry double gauze for the lining
Blurry sidey shot

Sunday, 1 March 2015

Wardrobe Architect Update!


I really enjoyed doing the first month of challenges for the Wardrobe Architect and I really did learn a lot about what shapes I like and what I actually feel comfortable, and more importantly, confident wearing. I spent practically a whole afternoon browsing the internet for patterns and looking at the wonderful creations that others have come up with on Pinterest. I managed to narrow down my list to patterns that I think will actually suit me, as well as meeting my requirements so I’m all good to go now. Doing this exercise also made me realise how many patterns I already own, which is helpful as Andy and I have been trying to be frugal recently. 

I’m really looking forward to making lots of dresses, including Darling Ranges, Staple Dresses and the Papercut Patterns Sigma dress. My list of shirts includes the Colette Violet, Grainline Alder and Archer and some basic camis/tops such as the Colette Sorbetto and the Sew Over It Cami.  I am also going to try and be a bit more daring and attempt a pair of trousers, a pair of shorts AND the Victoria Blazer from By Hand London (I think). I also need to tie in my aim to sew with knits in, so Mabel and Moneta are both on my to do list. 

One of the main things that I learnt from this process was that I need to nail my fabric choices for the clothes that I make. From now I’m going to be using a lot more neutral and/or subtle fabrics for my dressmaking. I learnt the hard way when I spent ages trying to make a Grainline Alder with some pale flowery double gauze which quite frankly, makes it look like I’m just off to bed in the Victorian times. Not a good choice, as beautiful as the fabric is, but the silver lining of this cloud is that my FBA worked a dream and I’m ready to use some much nicer fabric to perfect this garment!

Lots to do, so little time. But at the moment all this sewing is keeping me from going insane from the monotony of my day job which I’m very glad about.